War in Photos
  • Home
  • World War Two
  • About
    • Terms of Service
    • Privacy Policy
  • Contact
Search
  1. Home
  2. World War Two
  3. Pearl Harbor Raid
Gallery

Pearl Harbor Raid

December 7th 1941

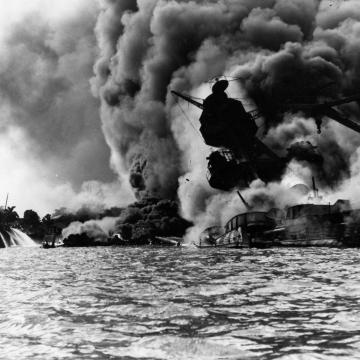
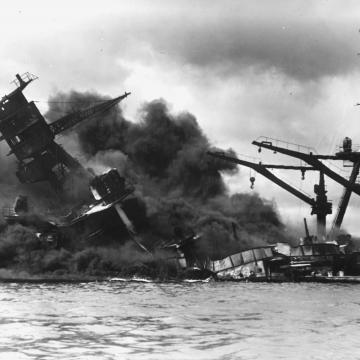
The Pearl Harbor Raid was a surprise attack by the Imperial Japanese Navy Air Service against the naval base at Pearl Harbor, Honolulu, Hawaii on December 7th, 1941. The raid directly resulted in the formal entry of the United States (who had been neutral until this point) into World War II the next day.

The attack was intended by the Japanese military as a preventative action to stop the United States Pacific Fleet from interfering with its planned military actions in Southeast Asia against overseas territories of the United Kingdom, the Netherlands, and the United States.

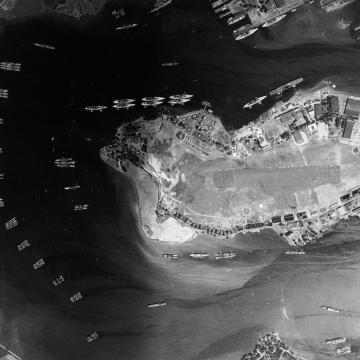
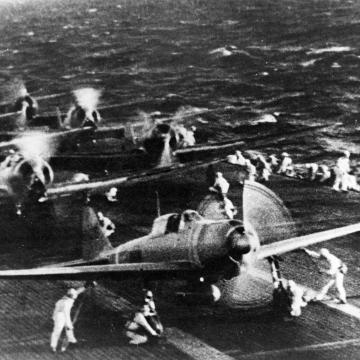
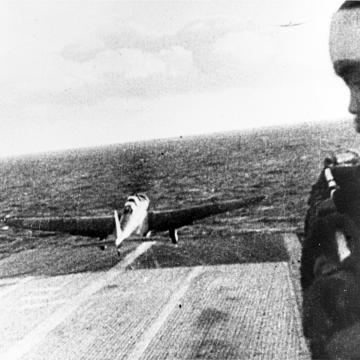
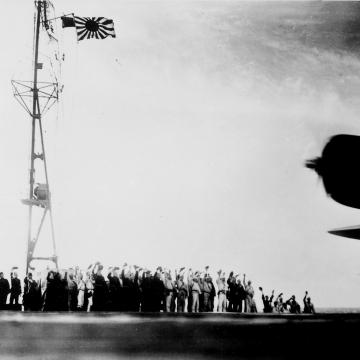
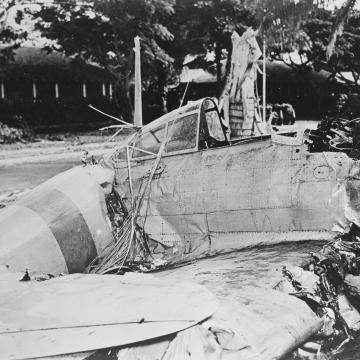
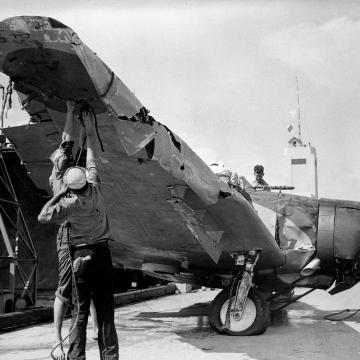
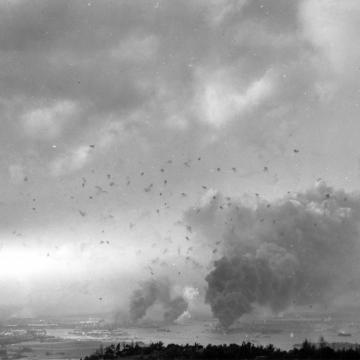
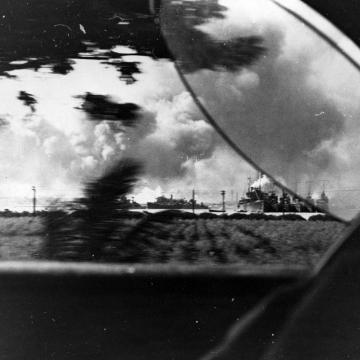
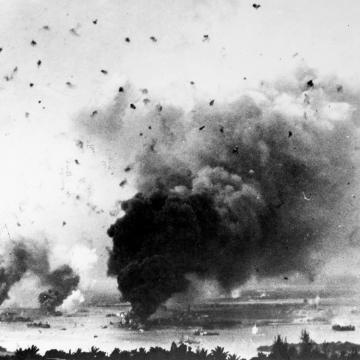
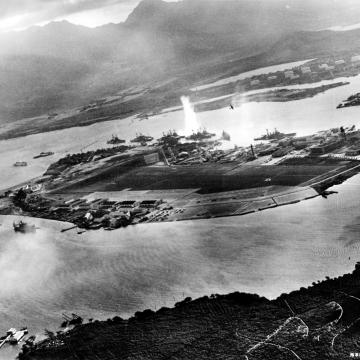
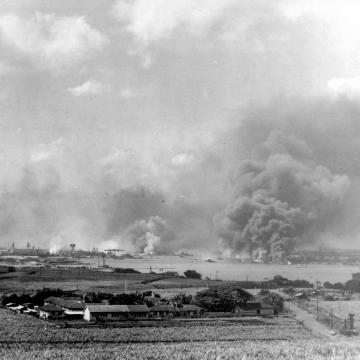
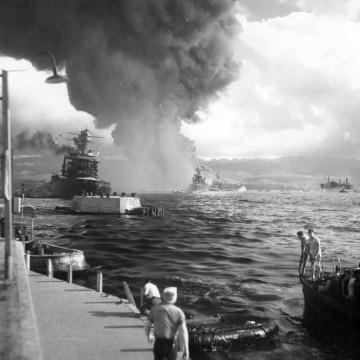
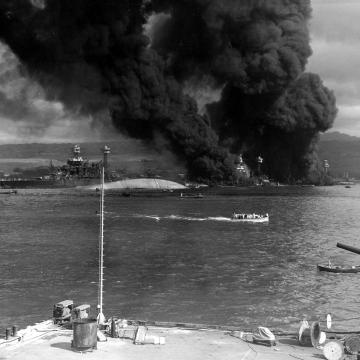
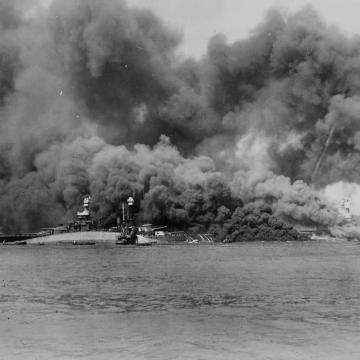
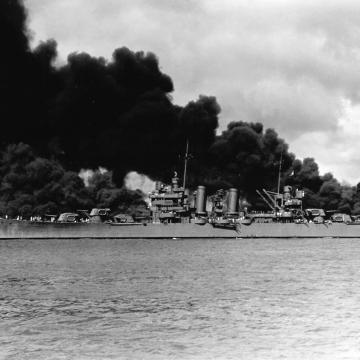
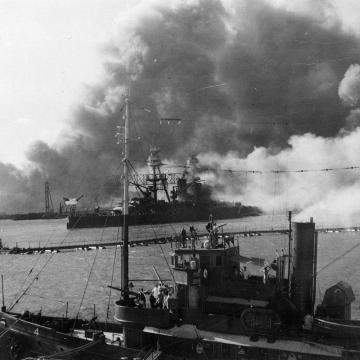
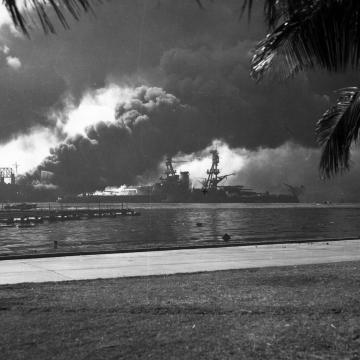
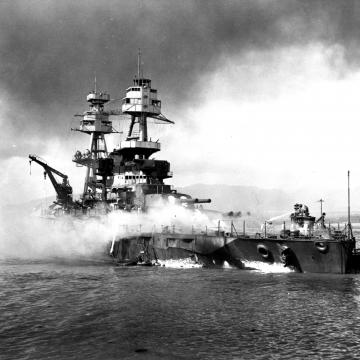
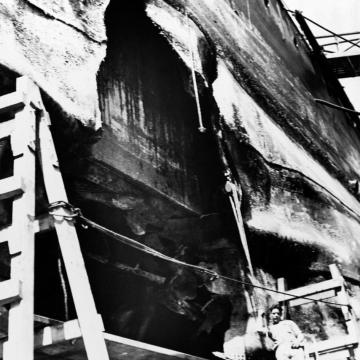
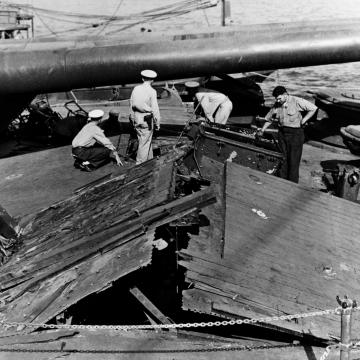
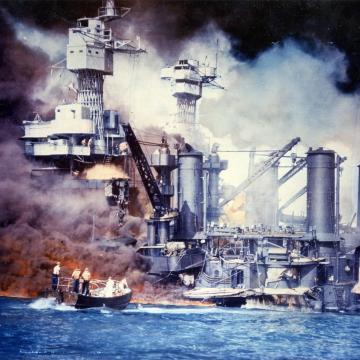
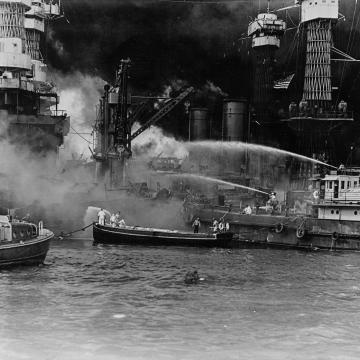
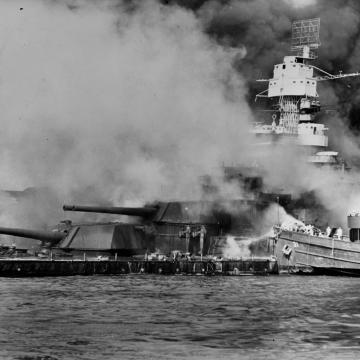
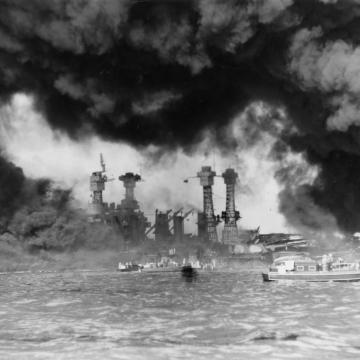
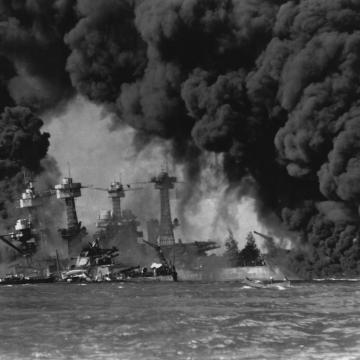
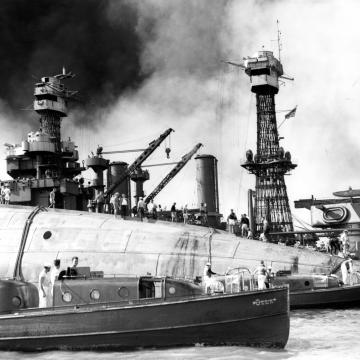
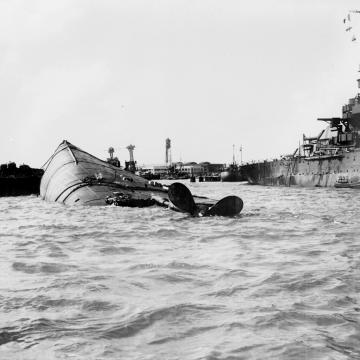
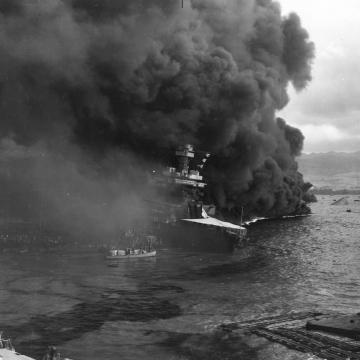
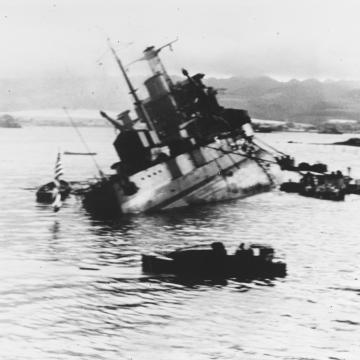
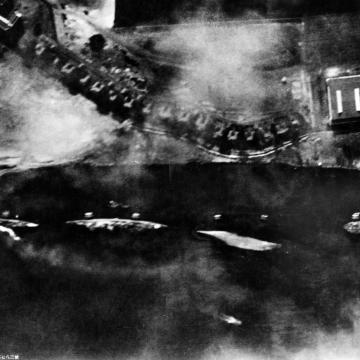
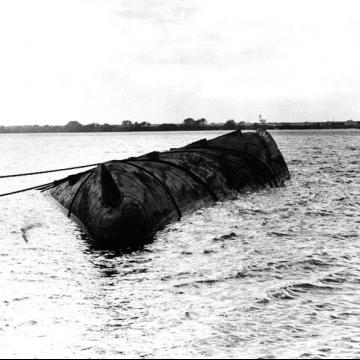
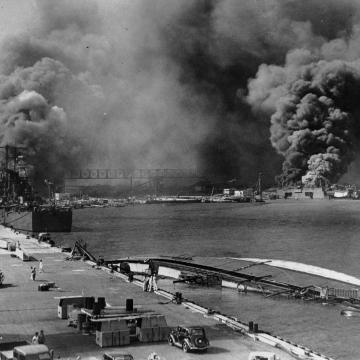
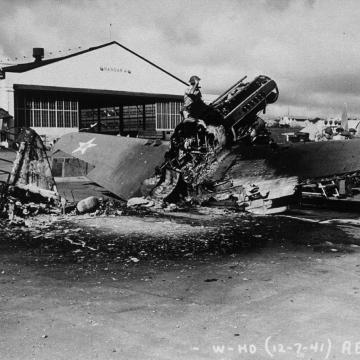
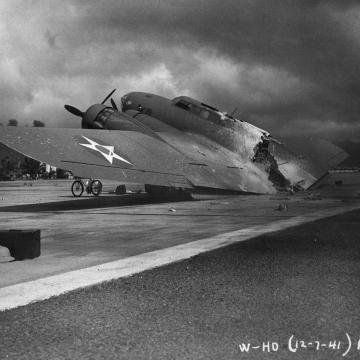
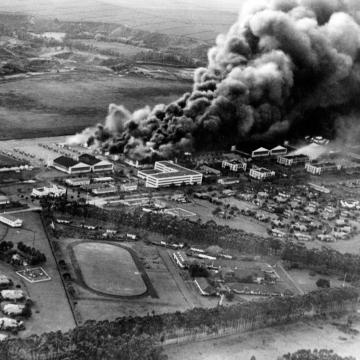
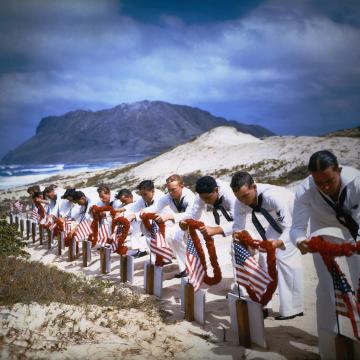
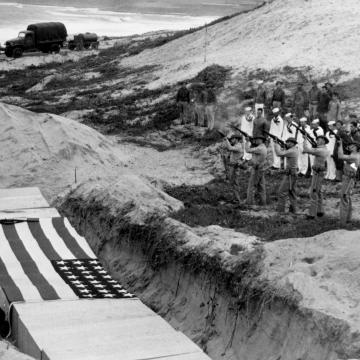
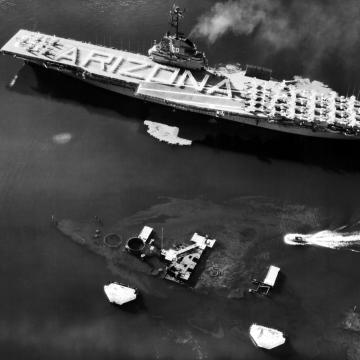
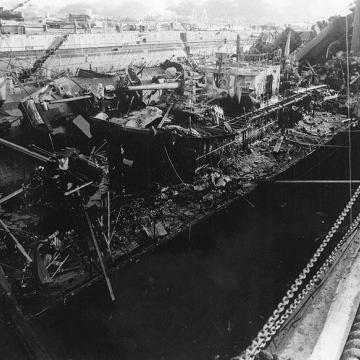
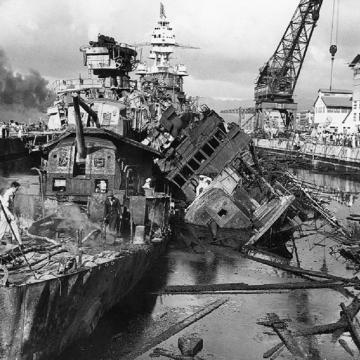
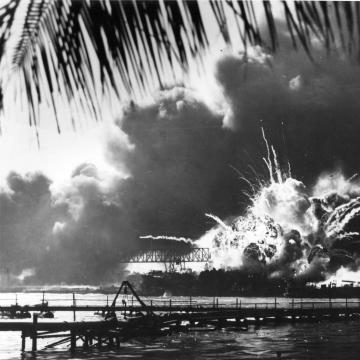
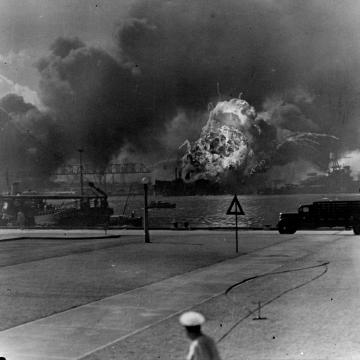
Starting at 7:48 a.m. Hawaiian Time, the base at Pearl Harbour was attacked by 353 Imperial Japanese aircraft in two waves, launched from six aircraft carriers. Of the eight U.S. Navy battleships present, four were sunk and all were damaged. The Japanese also sank or damaged three cruisers, three destroyers, an anti-aircraft training ship, and one minelayer. A total of 188 U.S. aircraft were destroyed; 2,403 Americans were killed and 1,178 others were wounded. Japanese losses were light: 29 aircraft and five midget submarines lost, and 64 servicemen killed.

Before the raid

Before the raid

Vertical aerial photograph from 17,200 feet altitude, looking directly down on East Loch and on the Fleet Air Base on Ford Island.

Taken on May 3rd 1940, after the conclusion of Fleet Problem XXI, and just prior to the May 7th receipt of word that the Fleet was to be retained in Hawaiian waters.
There are eight battleships and the carrier Yorktown (CV-5) tied up along the island's southeastern side (toward the top), with two more battleships alongside 1010 dock at top right center. Two light cruisers and two destroyers are among the ships moored along Ford Island's northwestern side. Seventeen other cruisers and over thirty destroyers are also visible, mainly in East Loch. At the seaplane base, at the southern (top right) tip of Ford Island, are at least 38 PBY patrol planes.

Fighters prepare for take off

Fighters prepare for take off

Japanese naval aircraft prepare to take off from an aircraft carrier (reportedly Shokaku) to attack Pearl Harbor during the morning of December 7th 1941.

Plane in the foreground is a "Zero" Fighter, in front of "Val" dive bombers. This is probably the launch of the second attack wave.

The original photograph was captured on Attu in 1943.

Supervising the attack

Supervising the attack

The Commanding Officer of the Japanese aircraft carrier Shokaku watches as planes take off to attack Pearl Harbor, during the morning of December 7th 1941.

The Kanji inscription at left is an exhortation to pilots to do their duty.

Bound for Pearl Harbor

Bound for Pearl Harbor

A Japanese Navy Type 97 Carrier Attack Plane ("Kate") takes off from the aircraft carrier Shokaku, en route to attack Pearl Harbor, during the morning of December 7th 1941.

Start your engines

Start your engines

Japanese Navy Aichi D3A1 Type 99 Carrier Bombers ("Val") prepare to take off from an aircraft carrier during the morning of December 7th 1941.

Ship in the background is the carrier Soryu.

Note: This image is frequently reproduced with the planes facing toward the right. The orientation shown here, with the planes facing toward the left, is correct.

Banzai!

Banzai!

A Japanese Navy Type 97 Carrier Attack Plane ("Kate") takes off from a carrier as the second wave attack is launched. Ship's crewmen are cheering "Banzai".

This ship is either Zuikaku or Shokaku.

Note light tripod mast at the rear of the carrier's island, with Japanese naval ensign.

Crashed Zero

Crashed Zero

Japanese Type 00 Carrier Fighter ("Zero") that crashed at Fort Kamehameha, near Pearl Harbor, during the attack.

This plane, which had tail code "A1-154" and a red band around its rear fuselage, came from the aircraft carrier Akagi.

Had a hard landing

Had a hard landing

Japanese Navy Type 99 Carrier Bomber ("Val") is examined by U.S. Navy personnel following its recovery from Pearl Harbor shortly after the attack.

This plane was relatively intact, except that its tail section was broken away. It came from the aircraft carrier Kaga.

Anti-aircraft shell bursts blot the sky

Anti-aircraft shell bursts blot the sky

Panorama view of Pearl Harbor, during the Japanese raid, with anti-aircraft shell bursts overhead.

The photograph looks southwesterly from the hills behind the harbor. Large column of smoke in lower right center is from the burning USS Arizona (BB-39). Smoke somewhat further to the left is from the destroyers Shaw (DD-373), Cassin (DD-372) and Downes (DD-375), in drydocks at the Pearl Harbor Navy Yard.

View from the road

View from the road

View taken around 0926 hrs. in the morning of December 7th 1941, from an automobile on the road in the Aiea area, looking about WSW with destroyer moorings closest to the camera.

In the center of the photograph are: USS Dobbin (AD-3), with destroyers Hull (DD-350), Dewey (DD-349), Worden (DD-352) and MacDonough (DD-351) alongside. The ship just to the left of that group is USS Phelps (DD-360), with got underway on two boilers around 0926 hrs.

The group further to the right consists of: USS Whitney (AD-4), with destroyers Conyngham (DD-371), Reid (DD-369), Tucker (DD-374), Case (DD-370) and Selfridge (DD-357) alongside.
USS Solace (AH-5) is barely visible at the far left.

Smoke rises from the Naval Yard

Smoke rises from the Naval Yard

View of Pearl Harbor looking southwesterly from the hills to the northward. Taken during the Japanese raid, with anti-aircraft shell bursts overhead.

Large column of smoke in lower center is from USS Arizona (BB-39). Smaller smoke columns further to the left are from the destroyers Shaw (DD-373), Cassin (DD-372) and Downes (DD-375), in drydocks at the Pearl Harbor Navy Yard.

The attack begins

The attack begins

Photograph taken from a Japanese plane during the torpedo attack on ships moored on both sides of Ford Island. View looks about east, with the supply depot, submarine base and fuel tank farm in the right center distance.

A torpedo has just hit USS West Virginia on the far side of Ford Island (center). Other battleships moored nearby are (from left): Nevada, Arizona, Tennessee (inboard of West Virginia), Oklahoma (torpedoed and listing) alongside Maryland, and California.

On the near side of Ford Island, to the left, are light cruisers Detroit and Raleigh, target and training ship Utah and seaplane tender Tangier. Raleigh and Utah have been torpedoed, and Utah is listing sharply to port.

Japanese planes are visible in the right center (over Ford Island) and over the Navy Yard at right.
Japanese writing in the lower right states that the photograph was reproduced by authorization of the Navy Ministry.

Smoke in the distance

Smoke in the distance

View looking toward the Pearl Harbor Navy Yard from the Aiea area, in the morning of December 7th 1941, during or soon after the end of the Japanese air raid.

USS Nevada (BB-36) is in the center distance. Large column of smoke to the left of her is from USS Shaw (DD-373), burning in the floating drydock YFD-2.

"Battleship Row" is in the right center. Largest mass of smoke there comes from USS Arizona (BB-39).

Chaos after the first wave

Chaos after the first wave

View looking down "Battleship Row" from Ford Island Naval Air Station, shortly after the Japanese torpedo plane attack.

USS California (BB-44) is at left, listing to port after receiving two torpedo hits. In the center are USS Maryland (BB-46) with the capsized USS Oklahoma (BB-37) alongside. USS Neosho (AO-23) is at right, backing clear of the area. Most smoke is from USS Arizona (BB-39).

Japanese destruction

Japanese destruction

View of "Battleship Row" from the head of 1010 dock, during or immediately after the Japanese raid. USS Arizona (BB-39) is sunk and burning at right. USS West Virginia (BB-48) is in the right center, sunk alongside USS Tennessee (BB-43), with oil fires shrouding them both. The capsized USS Oklahoma (BB-37) is in the left center, alongside USS Maryland (BB-46).

Note wire spools in the right foreground, one marked "Crescent Wire & Cable Co., Trenton, N.J.".

Smoke fills the sky

Smoke fills the sky

View of "Battleship Row" during or immediately after the Japanese raid. USS West Virginia (BB-48) is at the right sunk alongside USS Tennessee (BB-43), with oil fires shrouding them both. The capsized USS Oklahoma (BB-37) is at the left, alongside USS Maryland (BB-46). Crewmen on the latter's stern are using firehoses to try to push burning oil away from their ship.

Steaming past battleship row

Steaming past battleship row

The U.S. Navy light cruiser USS Phoenix (CL-46) steams down the channel off Ford Island's "Battleship Row", past the sunken and burning USS West Virginia (BB-48), at left, and USS Arizona (BB-39), at right, December 7th 1941.

Japanese aftermath

Japanese aftermath

View looking up "Battleship Row" on December 7th 1941, after the Japanese attack.

The sunken and burning USS Arizona (BB-39) is in the center. To the left of her are USS Tennessee (BB-43) and the sunken USS West Virginia (BB-48).

Escaping the smoke

Escaping the smoke

USS Nevada (BB-36) headed down channel after being intensely attacked by Japanese dive bombers.

Photographed from Ford Island, with USS Avocet (AVP-4) in the foreground and the dredge line in the middle distance.

Smoke is pouring from Nevada's forecastle area where (2) 250 bombs have struck. Minutes afterwards, she is given orders to beach herself opposite floating Drydock YFD-2 (holding USS Shaw) in order that the channel not be blocked. Minutes later, the current will have shifted Nevada 180 degrees so that she would face up Channel.

USS Shaw exploding

USS Shaw exploding

Sailors stand amid wrecked planes at the Ford Island seaplane base, watching as USS Shaw (DD-373) explodes in the center background, December 7th 1941.

USS Nevada (BB-36) is also visible in the middle background, with her bow headed toward the left.
Planes present include PBY, OS2U and SOC types. Wrecked wing in the foreground is from a PBY.

Smoke rises in the harbour

Smoke rises in the harbour

USS Nevada (BB-36) afire off the Ford Island seaplane base, with her bow pointed up-channel. The volume of fire and smoke is actually from USS Shaw (DD-373), which is burning in the floating dry dock YFD-2 in the left background.

Photographed from the southeastern shore of Ford Island, near the Naval Air station HQ building. A dredging line is visible at left.

USS Nevada beached in the sand

USS Nevada beached in the sand

USS Nevada (BB-36) beached and burning after being hit forward by Japanese bombs and torpedoes. Her pilothouse area is discolored by fires in that vicinity.

The harbor tug Hoga (YT-146) is alongside Nevada's port bow, helping to fight fires on the battleship's forecastle.
Note channel marker buoy against Nevada's starboard side.

USS Nevada's deck in ruins

USS Nevada's deck in ruins

View on the deck of USS Nevada looking aft toward the forward 14"/45 gun turrets and superstructure, showing bomb damage received during the Pearl Harbor attack on December 7th 1941.

Photographed was taken five days later, on December 12th 1941.

Collection of Vice Admiral Homer N. Wallin, USN.

Massive hole in USS Nevada

Massive hole in USS Nevada

Hole in the USS Nevada's port side, between about Frame 38 and Frame 46, caused by a Japanese Type 91 aerial torpedo that hit her during the December 7th 1941 air raid. Photographed on about February 19th 1942, in Pearl Harbor Navy Yard's Drydock Number Two.

The battleship's side armor is visible inside the hole's upper section.

Deck damage on USS Nevada

Deck damage on USS Nevada

Damage to the forecastle deck of USS Nevada (BB-36), caused by the explosion of a Japanese bomb below decks. Gun barrels of the battleship's forward 14"/45 triple turret are in the background.

Photographed on December 12th 1941 from on board USS Rail (AM-26), which was tied up alongside Nevada's starboard bow, assisting with salvage efforts.

Note officer in center, wearing a .45 caliber pistol.

USS Arizona ablaze

USS Arizona ablaze

USS Arizona (BB-39) ablaze, immediately following the explosion of her forward magazines, December 7th 1941.
Frame clipped from a color motion picture taken from on board USS Solace (AH-5).

USS Arizona burning furiously

USS Arizona burning furiously

USS Arizona (BB-39) sunk and burning furiously, December 7th 1941. Her forward magazines had exploded when she was hit by a Japanese bomb.

At left, men on the stern of USS Tennessee (BB-43) are playing fire hoses on the water to force burning oil away from their ship.

Sinking USS Arizona

Sinking USS Arizona

The forward superstructure and midships gun positions of the sunken USS Arizona (BB-39), afire after the Japanese raid, December 7th 1941.

At right are the ship's mainmast and boat cranes, which were beyond the areas wrecked by the explosion of her forward magazines.

Aftermath of USS Arizona

Aftermath of USS Arizona

USS Arizona burned out and sunk in Pearl Harbor on December 10th 1941, three days after she was destroyed during the December 7th Japanese raid.

Ships in the background are USS Saint Louis (CL-49), in center, and the hulked minelayer Baltimore (CM-1) at left.

This is one of a collection of photographs of salvage operations at Pearl Harbor Naval Shipyard taken by the shipyard during the period following the Japanese attack on Pearl Harbor which initiated US participation in World War II. The photographs are found in a number of files in several shipyard records series.

Rescuing a survivor

Rescuing a survivor

U.S. Navy sailors in a motor launch rescue a survivor from the water alongside the sunken USS West Virginia (BB-48) during or shortly after the Japanese air raid on Pearl Harbor.

USS Tennessee (BB-43) is inboard of the sunken battleship.

Note extensive distortion of West Virginia´s lower midships superstructure, caused by torpedo hits below. Also note 5"/25 gun, still partially covered with canvas, boat crane swung outboard and empty boat cradles near the smokestacks, and base of radar antenna atop West Virginia´s (BB-48) foremast.

Note: This is a color-tinted version, not an actual color photograph.

Fighting fires on USS West Virginia

Fighting fires on USS West Virginia

Fighting fires on the sunken battleship USS West Virginia (BB-48), December 7th 1941. The garbage lighter YG-17 is at right, with her crewmen playing two fire hoses at the flames. Assisting or standing by are a motor launch and an officer's motorboat.

USS Tennessee (BB-48) is inboard of West Virginia.

Sitting on the harbor floor

Sitting on the harbor floor

USS Tern (AM-31) fighting fires aboard the sunken USS West Virginia (BB-48), on December 7th 1941, immediately after the Japanese raid.

Note radar antenna, paravanes and 16"/45 twin gun turrets on the battleship.

Smoke blackens the sky

Smoke blackens the sky

Small craft standing by USS West Virginia (BB-48) as burning oil drifts past the sunken battleship, shortly after the end of the Japanese air raid.

USS Tennessee (BB-43) is moored on West Virginia's starboard side. Both ships are shrouded in smoke from the burning USS Arizona (BB-39), out of view to the right.

USS West Virginia burning strong

USS West Virginia burning strong

USS West Virginia (BB-48) afire forward, immediately after the Japanese air attack.

USS Tennessee (BB-43) is on the sunken battleship's opposite side.

Attempting to rescue survivors

Attempting to rescue survivors

Rescue teams at work on the capsized hull of the 29,000 ton battleship USS Oklahoma (BB-37), seeking crew members trapped inside. The ship capsized after being blasted by Japanese warplanes, December 7th 1941. Holes were burned through the hull to permit the rescue of some of the men trapped below.

The starboard bilge keel is visible at the top of the upturned hull.

Officers' Motor Boats from Oklahoma and USS Argonne (AG-31) are in the foreground.

USS Maryland (BB-46) is in the background.

USS Oklahoma rescue efforts

USS Oklahoma rescue efforts

The capsized hull of USS Oklahoma (BB-37), with a barge alongside to support rescue efforts, probably on December 8th 1941.

USS Maryland (BB-46) is at right, and USS California (BB-44) is in the center distance.

USS Oklahoma capsized

USS Oklahoma capsized

USS Maryland at berth F-5, with men working on the capsized hull of USS Oklahoma alongside, during or immediately after the Japanese attack.

USS Tennessee (BB-43) is visible in the left background.

Collection of Vice Admiral Homer N. Wallin, USN(Retired), 1975.

USS California hit by torpedoes

USS California hit by torpedoes

Scene on the southeastern part of Ford Island, looking northeasterly, with USS California (BB-44) in right center, listing to port after being hit by Japanese aerial torpedoes and bombs.

Sinking USS California

Sinking USS California

Crew abandoning the damaged USS California (BB-44) as burning oil drifts down on the ship, at about 1000 hrs on the morning of December 7th 1941, shortly after the end of the Japanese raid.

The capsized hull of USS Oklahoma (BB-37) is visible at the right.

Oil pours from Battleship Row

Oil pours from Battleship Row

Vertical aerial view of "Battleship Row", beside Ford Island, during the early part of the horizontal bombing attack on the ships moored there. Photographed from a Japanese aircraft.

Ships seen are (from left to right): USS Nevada ; USS Arizona with USS Vestal moored outboard; USS Tennessee with USS West Virginia moored outboard; USS Maryland with USS Oklahoma moored outboard; and USS Neosho, only partially visible at the extreme right.

A bomb has just hit Arizona near the stern, but she has not yet received the bomb that detonated her forward magazines. West Virginia and Oklahoma are gushing oil from their many torpedo hits and are listing to port. Oklahoma's port deck edge is already under water. Nevada has also been torpedoed.

Japanese inscription in lower left states that the photograph has been officially released by the Navy Ministry.

Donation of Theodore Hutton, September 21rst 1942.

USS Arizona spewing smoke

USS Arizona spewing smoke

Vertical aerial view of "Battleship Row", beside Ford Island, soon after USS Arizona was hit by bombs and her forward magazines exploded. Photographed from a Japanese aircraft.

Ships seen are (from left to right): USS Nevada; USS Arizona (burning intensely) with USS Vestal moored outboard; USS Tennessee with USS West Virginia moored outboard; and USS Maryland with USS Oklahoma capsized alongside.

Smoke from bomb hits on Vestal and West Virginia is also visible.

Japanese inscription in lower left states that the photograph has been reproduced under Navy Ministry authorization.

USS Utah capsizing

USS Utah capsizing

The U.S. Navy target ship USS Utah capsizing off Ford Island, during the attack on Pearl Harbor, December 7th 1941, after being torpedoed by Japanese aircraft.

Photographed from USS Tangier (AV-8), which was moored astern of Utah.

Note colors half-raised over fantail, boats nearby, and sheds covering Utah's after guns.

Destruction from above

Destruction from above

Photograph of the western side of Ford Island and ships in moorings offshore, taken from a Japanese Navy plane during the attack.

Ships are (from left to right): USS Detroit (CL-8); USS Raleigh (CL-7), listing to port after being hit by one torpedo; USS Utah (AG-16), capsized after being hit by two torpedoes; and USS Tangier (AV-8).

Japanese writing in the lower left states that the photograph's reproduction was authorized by the Navy Ministry.

Capsized USS Utah

Capsized USS Utah

Bow view of the capsized USS Utah (AG-16), as seen from the stern of USS Raleigh (CL-7) on December 12th 1941.

Utah had been torpedoed and sunk during the Japanese attack five days earlier.

USS Utah under attack

USS Utah under attack

A Japanese bomb explodes some twenty feet off the starboard side of USS Utah, forward of the bridge, during the Pearl Harbor air raid, December 7th 1941.

The original photograph was in the CinCPac report of the Pearl harbor Attack, February 15th 1942, Volume 3, in 1990.

USS Oglala capsized

USS Oglala capsized

View from Pier 1010, looking toward the Pearl Harbor Navy Yard's drydocks, with USS Shaw (DD-373) -- in floating drydock YFD-2 -- and USS Nevada (BB-36) burning at right, December 7th 1941.

In the foreground is the capsized USS Oglala minelayer (CM-4). She had been damaged by a torpedo that had actually hit the light cruiser USS Helena (CL-50), visible on the left. Helena was towed forward, while Oglala sank.

Beyond Helena is Drydock Number One, with USS Pennsylvania (BB-38) and the burning destroyers Cassin (DD-372) and Downes (DD-375).

Burned out P-40

Burned out P-40

Men examine the burned-out wreckage of a P-40 pursuit aircraft, near Hangar 4 at Wheeler Air Field, following the end of the Japanese raid on December 7th 1941.

Note long blast tubes for the plane's nose machine guns.

Wrecked B-17C

Wrecked B-17C

Wrecked Army Air Corps B-17C (serial # 40-2074) bomber near Hangar 5 at Hickam Air Field, following the end of the Japanese raid. This plane, piloted by Captain Raymond T. Swenson, was one of those that arrived during the raid after flying in from California. It was hit by a strafing attack after landing and burned in half.

Note bicycle parked by the plane. Pith helmet by the case in the left foreground indicates that the photographer was Tai Sing Loo.

Wheeler Army Air Field burning

Wheeler Army Air Field burning

Planes and hangars burning at Wheeler Army Air Field, Oahu, soon after it was attacked in the morning of December 7th 1941, as seen from a Japanese Navy plane.

USS Oklahoma being righted

USS Oklahoma being righted

USS Oklahoma righted to about 30 degrees, on March 29th 1943, while she was under salvage at Pearl Harbor. She had capsized and sunk after receiving massive torpedo damage during the December 7th 1941 Japanese air raid.

Ford Island is at right and the Pearl Harbor Navy Yard is in the left distance.

Farewell to Thee

Farewell to Thee

Following Hawaiian tradition, Sailors honour men killed during the December 7th 1941 Japanese attack on Naval Air Station Kaneohe, Oahu. The casualties had been buried on December 8th. This ceremony took place sometime during the following months, possibly on Memorial Day, May 31rst 1942.

Burying those lost

Burying those lost

A Marine rifle squad fires a volley over the bodies of fifteen officers and men killed at Naval Air Station Kanoehe Bay during the Pearl Harbor raid. These burial ceremonies took place on December 8th 1941, the day after the attack.

Note sandbagged emplacement atop the small hill in the right middle distance.

Tribute to USS Arizona

Tribute to USS Arizona

USS Bennington passes the wreck of USS Arizona (BB-39) in Pearl Harbor, Hawaii, on Memorial Day, May 31rst 1958. Bennington's crew is in formation on the flight deck, spelling out a tribute to the Arizona's crewmen who were lost in the December 7th 1941 Japanese attack on Pearl Harbor.

Note the outline of Arizona's hull and the flow of oil from her fuel tanks.

USS Arizona memorial

USS Arizona memorial

Photographed on August 21rst 1963, looking toward the morning sun.

Photographed by PH1 R.C. Moen.

USS Downes and Cassin

USS Downes and Cassin

USS Downes (DD-375), nearest to camera, and USS Cassin (DD-372), capsized against Downes in Drydock Number One at the Pearl Harbor Navy Yard, December 8th 1941, the day after they were wrecked by Japanese bombs and the resulting fires.

Drydock Number One

Drydock Number One

USS Cassin (DD-372) (capsized, right) and USS Downes (DD-375) in Drydock Number One at the Pearl Harbor Navy Yard on December 7th 1941, immediately following the Japanese attack. Both ships had been severely damaged by bomb hits and the resulting fires.

In the background, also in Drydock Number One, is USS Pennsylvania (BB-38), which had received relatively light damage in the raid.

USS Shaw's magazine explodes

USS Shaw's magazine explodes

The forward magazine of USS Shaw (DD-373) explodes during the second Japanese attack wave. To the left of the explosion, Shaw's stern is visible, at the end of floating drydock YFD-2.

At right, The bow of Nevada (BB-36) can be seen after her aborted escape attempt out channel. The tugboat USS Hoga (YT-146) maneuvers at the port bow of Nevada whose stern had swung 180 degrees back out towards sea channel after her quartermaster, under orders, nosed her bow into the mud at Hospital point. Hoga and companion tug YT-130 then pulled Nevada free and moved her to the western side of the channel where she settled into the mud at 10:45. A dredge line from the southern tip of Ford island is visible in the foreground. In background at left, smoke rises from Hickam Field.

Photographed from Ford Island.

USS Shaw goes up in flames

USS Shaw goes up in flames

Explosion of the forward magazines of USS Shaw (DD-373), in the floating drydock YFD-2, after a bombing attack by Japanese planes on December 7th 1941. USS Nevada (BB-36), also hit by the attackers, is at right.

Photographed from Ford Island, with USS Avocet (AVP-4) partially visible at left.

Aiming for the skies

Aiming for the skies

Crew of a .30 caliber machine gun in a sandbagged position, during or soon after the Japanese air raid, December 7th 1941.

Location may be Naval Air Station, Ford Island.

Join Our Newsletter

Get Notified Of New Galleries

Sign up for our newsletter to be notified of:

  • New galleries and photos
  • Special events and collaborations
  • Contests and giveaways

Thank you!

You have successfully joined our subscriber list.

War in Photos

Started in 2005 by a passionate history enthusiast who went by the handle "Karbine", War in Photos has evolved into a modern hub for war photography.

Links

  • Contact Us
  • Terms Of Service
  • Privacy Policy

Translate

français italiano español 汉语

Affiliates

  • Dennis Robinson

© 2009 - 2023 Dennis Robinson